Now that technology is easier and better than before, I am wondering why haven’t you started a podcast yet?
I am here to offer you a guiding light for your Podcast launch. I promise to make your process a cakewalk.
Let’s break the ice and dive deep into the podcast journey.What is a Podcast?
Podcasts are the digital audio files created on a specific topic. These files are made accessible on the internet after successful creation and can be easily downloaded on a computer or mobile device.
These files are generally located on iTunes and Spotify, however, they can also be hosted on websites.
How do Podcasts Work?
Mainly, you need two things to make your Podcast run. These are
- An audio file.
- An RSS field.
As WordPress evolves with an in-built RSS feed, it has become the first choice of many people looking to start a podcast.
Pick the Topic Cherry
To initiate a new podcast, the very first thing you need to do is to find your niche topic and select the underlying topics for it.
Also, understanding your audience and their interest is equally crucial.
The deliberation about the niche and listing out the topics helps you to have well-planned podcast episodes and grab more subscribers.
Necessities to Start a Podcast
There are a few basic things you require to accomplish a successful podcasting setup. These include
- A running website or blog.
- A recording apparatus.
- The tools to publish your podcast over the internet.
These are 10 baby steps to start a new podcast.
- Setting up the website
- Setting up the hosting service
- Selecting a podcasting equipment
- Scheduling your podcasting episodes
- Recording and publishing the podcast
- Transferring the media files to Blubrry
- Setting the Smart Podcast Player
- Incorporating your podcast with WordPress
- Trailer the podcast with the help of iTunes
- Presenting the podcast to iTunes
1. Setting up the Website
The very first thing you need to do to start your podcast is creating a website and choosing the right platform is a crucial step towards it.
The most recommended platform to move forward is – WordPress.org
As WordPress.org, also known as self-hosted WordPress, is free, customizable, and provides a variety of plugins, it is an ideal platform to set up your podcasting website.
The only thing you need to spend upon is purchasing the domain name and web hosting.
Note: Here, domain name refers to the address of your website on the internet and, web hosting refers to the location your website resides over the internet. In other words, it is the place where all your website’s files and images get saved.
Bluehost is the most popular and highly recommended hosting provider for WordPress.
2. Setting up the Hosting Service
The next important thing you need to do is selecting a good media hosting service.
As the podcasts constitute bigger audio files, serving them via web host may require an ample amount of server resources which may lead to a slow and unresponsive website.
The utilization of a podcast specific media hosting platform like Blubrry can relieve the above-mentioned problem up to a great extent.
The leading benefits of using Blubrry to run a podcast are as follows
- By providing a top-tier CDN, It offers a quicker and more robust way of content delivery.
- Including ID3 tagging, iTunes optimization, etc. Blubrry has many powerful tools to offer.
- It has great community support worldwide.
- Blubrry contributes a strong plugin called Blubrry Powerpress that provides an easier and effective way to regulate a podcast from your WordPress site.
3. Selecting a Podcasting Equipment
The next comes the selection of podcasting equipment.
Of course, you require a good quality microphone before moving forward.
The utilization of your computer’s microphone to accomplish the task is a NO thing here.
You are required to make an intelligent choice among a range of available options including Samson, RODE, Heil-PR40.
You also require a nice headphone to record your podcast.
4. Taking Your Podcasting Episodes on the Carpet
Now, it is time to prepare for your podcasting episodes.
Here are a few things you need to figure out before hitting the brick. These include
- The content of your episodes.
This includes the topics your episodes are going to cover, the order of your topics, and so on.
- Length of your episodes.
However, the duration of your episodes majorly depends on your content and audience, an ideal length can range between 20 mins to an hour.
- The selection of supporting media.
The sounds including background music and others are important to give striking effects to your podcast.
You can use any of the available options including free music archive, youtube audio library, and free stock music to advance your podcast.
5. Recording and Publishing the Podcast
You are all set to record your podcast finally. Well, you need audio recording software for both recording and modifying your audio files.
Audacity is the best option you can leverage.
Audacity is a free and open-source cross-platform program capable of creating high-quality competent podcasts.
Here are the steps you need to follow to record a podcast using Audacity
- Install Audacity and launch Audacity.
- Go to File menu > create a new project.
- Click on the record button and record your voice.
One of the most prominent advantages of Audacity is that you can edit your recording as many times as you can.
Hence, don’t worry about the pauses and breaks that occurred during the recording.

So you have successfully recorded your podcast by this time. Now, it is time to export it.
You can export your podcast in MP3 format to get a small size file with excellent quality.
Keep the finalized version saved in your machine for further use.
Now, let’s publish your podcast
For this, you need to follow the given steps
1. Login to your WordPress dashboard
2. Install and activate the Blubrry Power Press Podcasting plugin.
3. Navigate to the plugin’s Settings page with the help of the WordPress dashboard.

4. Click on the button shown in the above picture.
5. This will display a popup form given in the below picture

6. Enter the required details.
7. Next, you are required to give a podcast title and fill other iTunes fields.

8. Save the changes.
6. Transferring the Media Files to Blubrry
Now, you are required to transfer your podcast file to your selected media hosting service i.e. Blubrry.
The steps to do this are given below
1. Login to your Blubrry hosting account.
2. Click on Podcaster dashboard.
3. Click on the upload new media files option as shown in the below picture

4. On the next page, click on the upload new media button and transfer the files.
Your podcasting files are all set to get used in your WordPress site.
7. Setting the Smart Podcast Player
Smart Podcast Player is a paid WordPress plugin that enables users to download, play,
and share podcast episodes.
Install and activate this plugin to ensure a better user experience.
Go to Settings > Smart Podcast Player after successful installation and provide the
license key.

You can fetch this license key from your Smart Podcast Player website’s account.
Now, configure the plugin settings by clicking on ‘Player Defaults’.

Provide the required details asked in the above image.
Note: Skip the iTunes subscription link for now. We will come back and add it once we
get it in the upcoming steps.
You can also change the design settings for your podcast player as per your likes.
Don’t forget to save changes after performing the necessary settings.
Now, as your Smart Podcast Player is equipped, you are free to disable the Powerpress
podcast player.
Simply go to Powerpress > Settings, and disable the options as shown in the below
picture.

Save the settings.
8. Incorporating your Podcast with WordPress
1. Open the WordPress dashboard.
2. Go to Posts > Add New.
3. Establish a separate category for your podcast episodes.
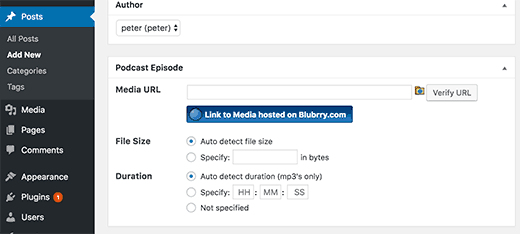
4. Scroll down to the podcast episode section as shown in the below picture

5. Click on the folder icon and choose the file transferred to Blubrry.
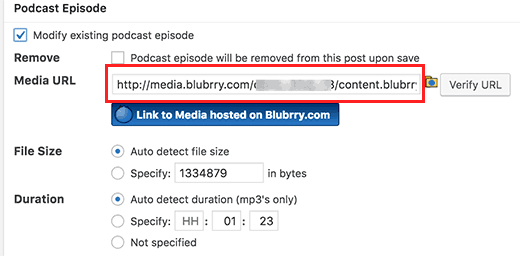
Note: This is exclusively for those who have uploaded the file to the Blubrry media. Others have to copy-paste their media file URL in the box.
Now, move up to the page and enter a good title and description for the podcast episode.
The visual editor will be having two buttons namely SPP and STP incorporated by the Smart Podcast Player plugin.

SPP button: Enables the incorporation of the entire Smart Podcast Player containing all the podcast episodes.
STP button: Enables you to create a blog post for a particular podcast episode.

Choose ‘Play a specific episode of your podcast’ as shown in the above picture. Give the URL of the desired media file in the next field.
This URL can be easily fetched from the podcast episode meta box in which you recently included the episode.

Now, hit the build shortcode button. This will allow you to notice a shortcode in the post editor area.
Hurray! You are free to publish your blog post.
9. Trailer the Podcast with the Help of iTunes
Last but not the least, you have to submit your podcast to iTunes and generate more subscribers for it.
However, before submitting, you may want to preview how it will resemble in iTunes.
Follow the below steps the fulfill the purpose
1. Open iTunes
2. Navigate to File > Subscribe to Podcast.
3. Provide feed URL.
4. Doing this, the iTune will retrieve the feed and present the same.

5. Observe the results.
10. Presenting the Podcast to iTunes
1. Install iTunes on your machine (the latest one always..).
2. Launch it.
3. You will observe a Store button on the top of the screen. Click on it.
4. Under the podcast menu in the iTunes store, you will see a ‘Submit a podcast’ option. Click on it.

5. Complete the submission process by giving the Apple ID, podcast URL, and so on.
6. The iTunes team will do a necessary review process after successful submission, and your podcast will be added to the iTunes directory.
